Showing posts with label no-sew doll house couch / sofa. Show all posts

Making a dollhouse couch (sofa) out of foamboard

Here is how to make your own doll house sofa out of foam board... we put it in our foamboard dollhouse.  Here is a finished picture, followed by detailed instructions.


Print this template... I designed the file to be 10.5" x 8".  You can scale it to be larger or smaller than that, or just come up with your own style!


Now lightly glue your template onto a piece of foam board.  (You will peel it off when you're done cutting it out so don't  use permanent glue stick.)


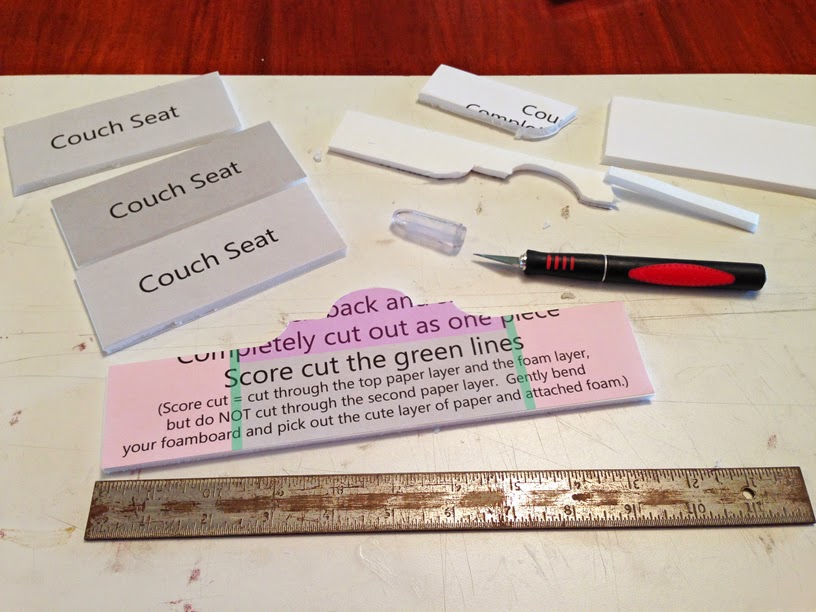
Using a straight edge, and a very sharp cutting device (see the picture for the type we like to use), trim out all the pieces...


The pictures below show what "score cut" means... The idea is, that when you score cut foamboard, you are only cutting through one layer of the paper and all of the foam... you do NOT cut through the second layer of paper.  By doing this, you can gently fold back the foam board both directions and then pick out the foam.  Score cutting is generally measured to be the same width as your foam board.  The foam board we use is 3/16th of an inch thick (4 cm).  If you have thicker foam board than this, please adjust the green line width in the template file.  


Note how score cutting allows you to have a finished looking corner with no visible foam.  It not only looks better, but helps you get your corners hot glued at 90 degrees.


Here are a couple of pictures showing the two ways you can glue your foam board that you have just score cut...


Next glue together the 3 couch (sofa) seat pieces...


Now take some fabric and "wrap" your sofa seat like it's a package, using hot glue where you would normally put tape if it were a package!


Next glue the bottom of your couch (sofa) back and sides to the middle of your fabric piece...


Now trace the sofa back shape onto the fabric...


Trim the fabric along your trace lines (you can leave some little fabric wings to cover part of the foam if you'd like, see the picture below)...


Glue the couch cushion to the back... the positioning of this is entirely up to you.  You can make it flush with the floor, or raise it up a bit like we did.


Now stand up the sides of the couch and hot glue them... we put glue in the white "gap" and along the side of the couch cushion.  Push down on it with your hand to make sure the glue makes good contact and keeps your couch at 90 degree angles...


Almost done!  The edges of the foamboard show... so...


...trim them with trim, or extra matching fabric, or rope... whatever you think looks good!  


That's it!  Have fun!


How to make your own dollhouse daybed!

You can create your own doll house day bed by following the directions in our no-sew doll house sofa post.  Just use a larger block for the base.  For back shape ideas you can look at pictures of real day beds.  Here are pictures of a couple I did with different kinds of fun feet!


More templates for the homemade no-sew dollhouse chair, couch, sofa

Here are the templates of the handmade no sew doll house chair / couch / sofa that I like the best so far.  Follow instructions from the earlier post.  To get it the correct size, copy this image and insert it in a Word editing program, resize it to 117% (Height 5.88" by Width 8.25").  This is to fit a chair block of 1.75" x 1.75" and a sofa/couch block of 4.5" x 1.75".


Another trim idea for the no sew dollhouse chair / sofa

If you are making your own dollhouse chair or sofa, here is another idea for trim.  It worked well... you can decide if you like the look or not!  This particular set reminds me of a candy cane!  (For instructions on making these, see our earlier posts.)


Another idea for the no-sew dollhouse chair / sofa legs

There's no reason a chair can't have 6 legs, is there?!  While not realistic looking, it does look unique and fun... just take a string of beads, clip off a few, and hot glue them to the bottom of our no sew sofa or chairs.  


More notes on a no-sew doll house couch, sofa, or arm chair

The general instructions to create your own dollhouse front room, living room, parlour, or den furniture are in our earlier post.  But here are some more notes!  

I found a cheap, realistic looking product from which to make doll house furniture legs... earring posts!  You can buy them in bags in the jewelry section of craft stores.  Use very small dots of hot glue to secure them to the bottom of your furniture piece.  Here is a close-up picture...


Here are three ways you can trim our no-sew doll house arm chairs, sofas, etc.
1.)  Thin decorative rope works much better than the thick rope used in the earlier post...


2.) A plain, slick yarn-like trim:


3.) Make your own trim by cutting very thin strips of coordinating or matching fabric.  I recommend using a sewing glue for this type, not hot glue.  


Another thing you can do to give your doll house chair, couch, or sofa a different look is glue trim around the base of it.  Sometimes the raw edge of certain fabrics works great - that's what this picture is of - otherwise, experiment with different kinds of trimming and ruffles.

Make your own dollhouse couch / sofa!


Following the same steps as the post on how to make your own no-sew dollhouse chair, you can easily make a couch or sofa. (For a sofa the block of wood should be approximately .75" x 1.75" x 4.5") Note that this furniture set I made uses smaller decorative rope, and I also added cushions... if you can sew, it would be easier to make your own small cushions that way, but I experimented with fabric glue, and it worked well.

Make your own handmade no-sew dollhouse chair or sofa!

(To view all the doll house armchair and couch posts together, use the "no-sew doll house couch / sofa" label at the top left.)


If you've ever admired real dollhouse front room furniture, but know it is out of your price range and looks way to complicated for you to ever even think of sewing it... then this post is for you! It is a super easy, homemade no-sew way of making your own realistic looking dollhouse family room / front room / parlor furniture.


You'll need: a block of wood 1.75 inches square, fabric, coordinating decorative rope, fabric stiffener that has adhesive on both sides, 4 same sized beads, and a glue gun. Here is a picture of the fabric stiffener stuff I used and it worked well:


If you're not picky, a square block of wood will work just fine, but if you are picky, you can angle one side slightly and round one corner... then when you assemble the chair the back will angle back slightly instead of straight up and down, and the chair seat will look more like it is a cushion. Here's a picture of a sample side view:


Next, take a piece of paper or card stock, fold it in half length wise. Center your block on the fold on the bottom edge. Imagine what you want the side of your chair to look like and sketch it. If you don't want to sketch your own, you can print this template and use it to create the chair back you see in this post (*note: when printed, the grey area of this template should measure 3.56 inches high and 5.107 inches wide. You might have to copy and paste it into a word processing program or photo editing program to force it to be that size.)


If you chose to draw your own shape, fold the paper in half and cut:


Now wrap your template around your wood block to test and make sure it is how you want it to look. It is okay that the template doesn't come completely to the front edges of the block - this makes just enough room to nest your rope trim in:


Using your template as a guide, measure enough fabric to cover your template twice, and enough fabric stabilizer to cover it once:


Follow the manufacturer's directions to fuse the fabric to both sides of your fabric stabilizer.


Using the template, cut out your shape...


Now, cut a piece of fabric just big enough to fully cover the wood block. Smear the block with a thin layer of glue and "wrap" it just like you would a package!


Position your wrapped block at the bottom and in the center of your fabric chair arms and back. Holding firmly, start hot gluing the two pieces together:


Now take your decorative roping/edging and beginning at the bottom on one side, hot glue the edging on a little at a time. *note, use very small amounts of glue here or it will show and not look as nice:


Now turn the chair over and put 4 blobs of hot glue in each corner and push a bead into each:


You're done! You can add a cushion for height or just to look nice if you'd like. Here are some finished picture of this chair:


For additonal ideas and notes and more pictures of doll house couches and arm chairs, visit this post.

Better yet, to view all the posts together, use the "no-sew doll house couch / sofa" label on the top left.


We also occasionally sell cheap already made furniture... for more information and what's currently available, visit this furniture page of our dollhouse decorating website!