A fun way to build a quick dollhouse out of CD cases and 3D printed connector pieces!

I just saw this on Thingiverse, and thought some of you might like it!  It's a clever idea to use old CD cases with 3D printed connectors... no gluing required!  I also like that you can easily "re-wallpaper" or "re-floor" the house.  (You can see some of our free printable doll house wallpaper here or some of our free printable dollhouse flooring here.)  Of course not everyone has a 3D printer yet, but they are getting more common so you might be able to find someone close to you to print the connector pieces (this maker made the files available at no cost)... Be sure to check out the 2 videos... you can even make a quick studio room.  Have fun!

Again, this house is NOT my work, I am simply passing it along because I think you all might like it!  Select the picture to be taken directly to their plans, and be sure to watch the videos!

Making a dollhouse couch (sofa) out of foamboard

Here is how to make your own doll house sofa out of foam board... we put it in our foamboard dollhouse.  Here is a finished picture, followed by detailed instructions.


Print this template... I designed the file to be 10.5" x 8".  You can scale it to be larger or smaller than that, or just come up with your own style!


Now lightly glue your template onto a piece of foam board.  (You will peel it off when you're done cutting it out so don't  use permanent glue stick.)


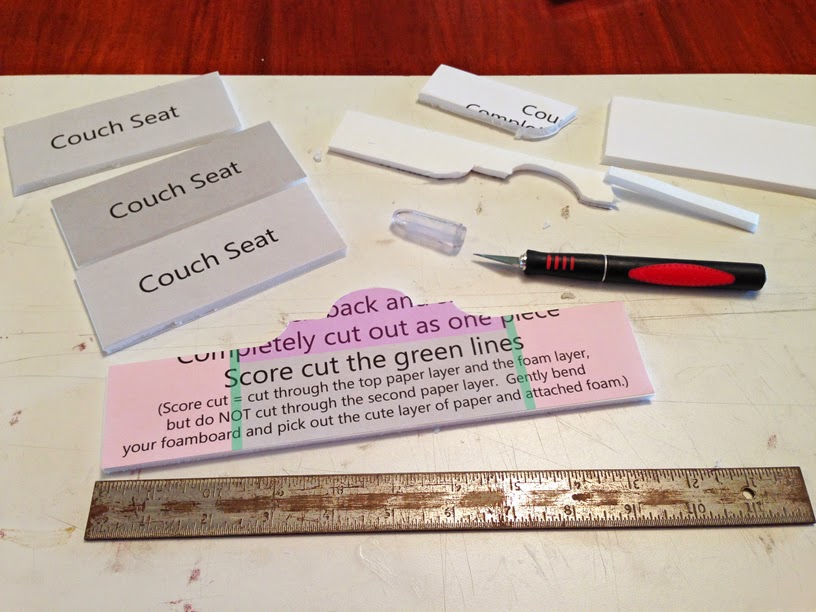
Using a straight edge, and a very sharp cutting device (see the picture for the type we like to use), trim out all the pieces...


The pictures below show what "score cut" means... The idea is, that when you score cut foamboard, you are only cutting through one layer of the paper and all of the foam... you do NOT cut through the second layer of paper.  By doing this, you can gently fold back the foam board both directions and then pick out the foam.  Score cutting is generally measured to be the same width as your foam board.  The foam board we use is 3/16th of an inch thick (4 cm).  If you have thicker foam board than this, please adjust the green line width in the template file.  


Note how score cutting allows you to have a finished looking corner with no visible foam.  It not only looks better, but helps you get your corners hot glued at 90 degrees.


Here are a couple of pictures showing the two ways you can glue your foam board that you have just score cut...


Next glue together the 3 couch (sofa) seat pieces...


Now take some fabric and "wrap" your sofa seat like it's a package, using hot glue where you would normally put tape if it were a package!


Next glue the bottom of your couch (sofa) back and sides to the middle of your fabric piece...


Now trace the sofa back shape onto the fabric...


Trim the fabric along your trace lines (you can leave some little fabric wings to cover part of the foam if you'd like, see the picture below)...


Glue the couch cushion to the back... the positioning of this is entirely up to you.  You can make it flush with the floor, or raise it up a bit like we did.


Now stand up the sides of the couch and hot glue them... we put glue in the white "gap" and along the side of the couch cushion.  Push down on it with your hand to make sure the glue makes good contact and keeps your couch at 90 degree angles...


Almost done!  The edges of the foamboard show... so...


...trim them with trim, or extra matching fabric, or rope... whatever you think looks good!  


That's it!  Have fun!


A Quick, Easy, Fun, Cheap Foam-board Dollhouse!

This was such a fun, fast project!  We decided to try our hand at creating a different type of doll house made from foamboard.  It is extremely light weight.  It is actually quite sturdy, but probably would not hold up to someone sitting or stepping on the side or back walls.  The decorating was super simple too... we decorated it before putting it together (with the exception of final trims).  We used items on hand... scrapbooking paper (affixed with glue stick), duct tape, and some left over fabric scraps for flooring.  Here are some pictures with extra directions so you get the idea... The possibilities are endless, so have fun creating!

If you are new to our blog, be sure to check out the free printable wallpaper and floorings.  They would work great with these foam dollshouses too!

YOU NEED:
*2 sheets foamboard (dollar store foam board is what we used)
*razor-blade (exacto) knife to cut the foam board
*glue stick
*hot glue
*decorating supplies (duct tape, scrapbooking paper, print-outs, etc.)


Use this as a guide... You can cut each piece out and glue everything separate if you are more comfortable with that.  We chose to use a "scoring" method for some of the cuts as it makes it a bit easier if you only have 2 hands!  If you are uncertain what this means, please comment and I will create a separate post.  

If you would like to cover edges that will be showing after your house is completed, use the above method...

...and trim out the corner so that you can use hot glue to stick down your finished edges.

Hello Kitty duct tape siding!  This is the fastest, most fun, easiest dollhouse siding I've ever done :) Not realistic looking, but that wasn't the aim here.

The walls being raised... notice everything has been predecorated - just stuck everything on with glue stick.  The wall corners were secured with a line of hot glue.

Once you have the entire house frame glued together, lay the  house on the second piece of foamboard and trace the outline.

Here's the outline.  Cut it out using your exacto knife.

Once it's cut out, make sure it fits and trace the interior rooms...

...decorate the back walls of the dollhouse

Here's the completed project, all hot-glued together!


You can add some think duct tape to the edges if you wish, either for looks or if it feels like the glue isn't sticking on the edges.

Note that using a hot glue gun does leave some "light shining through" but nothing major.

We added this purple flower trim (because it was what we had) to cover up the white part of the foam board.

This room is tiny but we wanted to experiment with gluing an interior wall.

Other ideas:

*Cut doors and windows into your foam-board dollhouse...
*Make a 100% duct-tape covered foam dollhouse :)
*Poke holes through the back wall and stick Christmas lights through to light up your foamboard doll house (see our other blog posts for ideas and pictures) 

Free "oiled walnut" dollhouse floor - extra large file!

If you are decorating a doll house that has larger floors than our other files print, here is an extra large file of wooden flooring.  It should print around 30" x 30".  You could use a printing service (like Costco, or Walmart) and print either a regular print or a poster print to get some "instantly ready" flooring.  I have not done this so do not know how durable it would be without spraying with an acryllic sealer... let us know if you do it - do you like it, would you do it again, what would you do different...  Enjoy!

(Be sure to select the picture, save to your computer or device and print (or order a print) from there.  Printing this page will not print the full resolution of the floor.)

As always, for personal use only.  Thank you!   


close-up photos of doll house carpet samples

Here are some close up pictures of fabrics that work well for dollhouse carpet... the upholstrey fabric is easiest to install as it tends to be stiff.  It all works though!


Great List of Free Dollhouse plans and tutorials

This site called Home Tips World just came to our attention, and if you're looking for free ideas to make your own doll house, you'll like them too.  There's everything from bookshelf style dollhouses, to room boxes, to sewn doll houses, to magazine doll houses, to a unique fairy dollhouse!
http://www.hometipsworld.com/the-top-16-free-dollhouse-plans-tutorials.html

doll house wall box roof: free printable

Here's a free printable for you in case you want to "roof" your dollhouse wall box...


Dollhouse Wall Boxes


If you love "dollhousing" but don't have a lot of time or space or money, these are very fun!  Hammer together some wooden boxes, affix a picture hanger to the back, and decorate as you have time.  You could eventually have an entire "house" hanging on your wall!  They also work well as gifts for a child, or as a "memory diorama" for someone who is moving and you want to preserve the memory of their home. 

You can decorate them the traditional way with paint/glue/wallpaper, or you can (as we've done below) glue everything to card stock and make the doll house wall box very easy to change... you can have a Palace one day and a Log Cabin the next!

Start with a wooden box:  (The INTERIOR measurements of the box shown are 9.25 inches wide, 7.75 inches tall, 5 inches deep)


Now, you can decorate the dollshouse wall box the traditional way with paint, glue, wallpaper, etc. Or, as we've done in these two samples, use pictures to help you along.  These two wall boxes use edited internet pictures, but you could just as easily take your own, especially with the panorama feature most cameras now have.  

Print the pictures, glue them to card stock, and cut to the correct size.  Do the same thing with your choice of flooring.


Now, you can either glue these on for a permanent theme, or affix them with tape for a quick "redecorate" now-and-again!

Tape Method 1:  (I tried this and decided my fit was too close, so opted for Method 2)


Tape Method 2:  This is what I like for a changeable dollhouse theme


Here are some completed pictures of the palace dollhouse wall box:


 Notice how in the picture above the perspective makes the 5 inch deep box appear deeper? 

Don't forget, these dollhouse diorama boxes can be either hung on a wall, or set on a shelf.


 And, here are some pictures of a very quick and easy log cabin dollhouse room... It would be very fun (or a great home-school project) to do Laura Ingalls Wilder doll house rooms... her dugout, little cabin in the woods, house, etc. 


These pictures were all from different sources but I edited them in Photoshop to get the color tones to match... As you can see, the corners don't match up, but by the time you decorate, you don't notice (at a first glance anyway!)

Can you see the picture above the mantel?  I put a small piece of tape directly on the "wallpaper", then attached the picture with a piece of looped tape.  Now, when we decide to redecorate, the picture easily comes off and won't tear the wallpaper. 
 

Remember,  one plus of this tiny project is that it can be stored anywhere... even on your bookshelf while waiting for paint to dry!


Have fun!!